Add several users at the same time to Office 365
Each person on your team needs a user account before they can sign in and access Office 365 services, such as email and Office. If you have a lot of people, you can add their accounts all at once from an Excel spreadsheet or other file saved in CSV format.
To add multiple users to Office 365
1. Download this sample spreadsheet and open it in Excel.
Your spreadsheet needs to include the same column headings as the sample one. It also needs to include values for the user name (like bob@contoso.com) and a display name (like Bob Kelly) for each user. To leave other fields blank, enter a space plus a comma in the field as shown in the following figure.

If you have people working in different countries, you’ll need to create one spreadsheet for users in each country. For example, one spreadsheet that lists everyone who works in the US, and another that lists everyone who works in Japan. This is because the availability of Office 365 services varies by region.
2. Sign in to Office 365 with your work or school account.
3. Select the app launcher icon ![]() in the upper-left and choose Admin.
in the upper-left and choose Admin.

4.Select Users > Active Users

5. Choose ![]() as shown in the following figure.
as shown in the following figure.

The Bulk add user’s wizard appears and steps you through adding a group of users to Office 365.
6. In Step 1 – Select a CSV file, specify your own spreadsheet as shown in the following figure.
![clip_image002[5]](http://blog.aisplstore.com/wp-content/uploads/2015/06/clip_image0025.png "clip_image002[5]")
7. In Step 2 – Verification, the wizard tells you whether the content in the spreadsheet is formatted correctly.

1. In Step 3 – Settings, choose Allowed so that the people listed in your spreadsheet will be able to use Office 365. Also choose the country in which these people will use Office 365. Remember if some people in your organization are going to use Office 365 in a different country, create a separate spreadsheet with their names and run the Bulk add users wizard again to add them.
![clip_image002[7]](http://blog.aisplstore.com/wp-content/uploads/2015/06/clip_image0027.png "clip_image002[7]")
2. The assign licenses page tells you how many licenses are available.
![clip_image004[5]](http://blog.aisplstore.com/wp-content/uploads/2015/06/clip_image0045.png "clip_image004[5]")
Go to Billing in the Office 365 admin portal. After buying more licenses, you’ll have to wait a few minutes for the order to be processed and then start the Bulk add users wizard from the beginning.
If you don’t buy more licenses, accounts won’t be created for everyone listed in your spreadsheet.
In this example, we don’t buy any more licenses and continue with the Bulk add users wizard.
3. In Step 5 – Send Results, type the email addresses of the people who you want to get an email that lists all of the Office 365 user names and temporary passwords for the people in the spreadsheet.

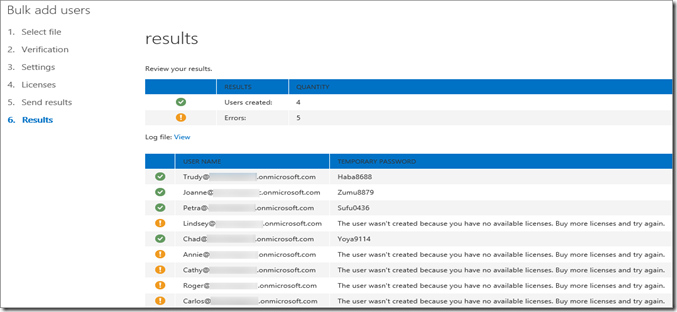
The following email is sent to all the email addresses you specified in Step 5 – Send results. This email indicates which accounts were created. Notice that accounts weren’t created for some people because there weren’t enough licenses.

4. The final page in the Bulk add users wizard lists the user names and temporary passwords, as shown in the following figure.

Leave a Reply
Want to join the discussion?Feel free to contribute!